networking:
AWS, data engineering, sql server, talend, postgres, business intelligence, car diy, photography
Search
Tuesday, 2 December 2014
ADB Android Debug Bridge Commands
networking:
Wednesday, 26 November 2014
How to Unlock / Flash a HTC DESIRE S with a new ANDROID KITKAT ROM
Firstly, enable USB debugging, and to install from UNKNOWN sources
http://www.recovery-android.com/enable-usb-debugging-on-android.html
Next, install the HTC SYNC app on a pc
http://www.htc.com/uk/software/htc-sync/
This will install the HTC SYNC app, and also the HTC USB drivers that are needed.
Now uninstall the HTC SYNC app, but leave the HTC drivers installed.
Next, connect the phone via USB to the pc to check to see if the PC can connect to the phone, and see it as a USB drive.
Now time to download various additional files for UNLOCK, RECOVERY, and OS INSTALL
Open the following page for reference, and continue reading below.
http://androidforums.com/threads/how-to-unlock-install-recovery-and-root-with-htcdev.702090/
1) grab the ADB / fastboot files
http://www.mediafire.com/?hzf1u4bowjewhdq
2) grab a copy of the RECOVERY app
http://phandroidfourm.blogspot.co.uk/2013_03_01_archive.html
Download link at the bottom of the page is :
http://forum.xda-developers.com/attachment.php?attachmentid=926566&d=1330610421
3) grab a copy of the KITKAT rom for HTC Desire S (HTC DS) "XperiaKatsaga.zip"
http://forum.xda-developers.com/showthread.php?t=2780606
ROM:http://forum.xda-developers.com/showthread.php?t=2780606
Replace this:META-INF.zip
meta-inf link : http://forum.xda-developers.com/attachment.php?attachmentid=2794366&d=1402586347
READ THIS IF YOU WANT GOODIES:
3.1)Open the ROM zip file and replace the meta-inf folder with the attachment above.
3.2)Step 1 will give you lot of goodies and no need to flash Gapps,If you dont want goodies
3.3)step b.1 & b.2 are not compulsory but beneficial
"GOODIE STEPS" not tested with BR2 but should work
4) grab a copy of GOOGLE APS install zip "gapps-kk-20140105-signed.zip"
https://drive.google.com/file/d/0B6fG7jfMahEpUDhYRUhOVWh0TXM/edit
5) grab a copy of the superuser app from the xda thread
http://download.chainfire.eu/633/SuperSU/UPDATE-SuperSU-v2.35.zip?retrieve_file=1
6)unlock with htcdev (http://www.htcdev.com/bootloader)
TIP:
In the dropdown list select ''All other supported models'' and follow the instructions.
which will take you to "http://www.htcdev.com/bootloader/unlock-instructions"
Click through to page 2 (aka Proceed to Step 5)
(http://www.htcdev.com/bootloader/unlock-instructions/page-2)
- don't bother with downloading the fastboot binary
- you have already downloaded it via step (1) above.
7) unzip (1) somewhere, and open CMD as administrator at the unzipped folder location.
8) Type "fastboot oem get_identifier_token"
8.1) to check you have connection to the phone type (via cmd)
"adb devices"
or "fastboot devices"
9) you should now be at Step 6 on the "http://www.htcdev.com/bootloader/unlock-instructions/page-2" page.
Follow it's instructions.
Submit your device identifier token, and HTCDEV will email the unlock binary.
10) Once you've submitted the token, you'll be sent an email with your unlock key as a file attachment.
Follow the further instructions and a link to complete the Bootloader process that's in the email.
You'll be directed to flash the unlock token with a command similar to:
fastboot flash unlocktoken Unlock_code.bin
This will result in an unlocked phone.
Now, you are ready to have a RECOVERY app installed, and then the new OS, and Google Apps, and the SU app.
11) Flash a recovery
Grab "recovery.img" is inside the RECOVERY zip file that was downloaded in (2), and move it to the ADB folder, then issue the command:
via cmd>fastboot flash RECOVERY recovery.img
11.1) In HBOOT (HTC Bios) select "RECOVERY"
This will boot up the RECOVERY app that was just flashed.
11.2) Within RECOVERY
-make a backup of your stock,unrooted rom. completely optional,but a very good idea,IMO.
-wipe cache
-wipe dalvik cache
-install zip from sd card
Install the ROM (3)
Install the Google App store (4)
Install the SU app (5)
-REBOOT BACK INTO HBOOT / HTC BIOS.
12) flash root files
12.1) Within the KITKAT ROM zip file, there's a "boot.img" file
We need to flash this to the phone similar to how the RECOVERY image was flashed.
NOTE THE DIFFERENT COMMAND
via cmd>fastboot flash BOOT boot.img
Now reboot, and give the phone 10 minutes to boot up.
The screen will appear black, but give it 10 minutes - leave the phone alone.
Monday, 17 November 2014
T-SQL Logical Query Processing Phases
Logical Query Processing Phases
This section introduces the phases involved in the logical processing of a query.
I will first briefly describe each step.
Then, in the following sections, I’ll describe the steps in much more detail and apply them to a sample query.
You can use this section as a quick reference whenever you need to recall the order and general meaning of the different phases.
Listing 1-1 contains a general form of a query, along with step numbers assigned according to the order in which the different clauses are logically processed.
Listing 1-1 Logical query processing step numbers
(8) SELECT (9) DISTINCT (11)
(1) FROM
(3)
(2) ON
(4) WHERE
(5) GROUP BY
(6) WITH {CUBE | ROLLUP}
(7) HAVING
(10) ORDER BY
In most programming languages, the code is processed in the order in which it is written.
In SQL, the first clause that is processed is the FROM clause, while the SELECT clause, which appears first, is processed almost last.
Each step generates a virtual table that is used as the input to the following step.
These virtual tables are not available to the caller (client application or outer query).
Only the table generated by the final step is returned to the caller.
If a certain clause is not specified in a query, the corresponding step is simply skipped.
Following is a brief description of the different logical steps applied in both SQL Server 2000 and SQL Server 2005.
Brief Description of Logical Query Processing Phases
Don’t worry too much if the description of the steps doesn’t seem to make much sense for now.
These are provided as a reference.
Sections that come after the scenario example will cover the steps in much more detail.
- FROM: A Cartesian product (cross join) is performed between the first two tables in the FROM clause, and as a result, virtual table VT1 is generated.
- ON: The ON filter is applied to VT1. Only rows for which the
is TRUE are inserted to VT2. - OUTER (join): If an OUTER JOIN is specified (as opposed to a CROSS JOIN or an INNER JOIN), rows from the preserved table or tables for which a match was not found are added to the rows from VT2 as outer rows, generating VT3. If more than two tables appear in the FROM clause, steps 1 through 3 are applied repeatedly between the result of the last join and the next table in the FROM clause until all tables are processed.
- WHERE: The WHERE filter is applied to VT3. Only rows for which the
is TRUE are inserted to VT4. - GROUP BY: The rows from VT4 are arranged in groups based on the column list specified in the GROUP BY clause. VT5 is generated.
- CUBE | ROLLUP: Supergroups (groups of groups) are added to the rows from VT5, generating VT6.
- HAVING: The HAVING filter is applied to VT6. Only groups for which the
is TRUE are inserted to VT7. - SELECT: The SELECT list is processed, generating VT8.
- DISTINCT: Duplicate rows are removed from VT8. VT9 is generated.
- ORDER BY: The rows from VT9 are sorted according to the column list specified in the ORDER BY clause. A cursor is generated (VC10).
- TOP: The specified number or percentage of rows is selected from the beginning of
VC10. Table VT11 is generated and returned to the caller.
Sunday, 4 May 2014
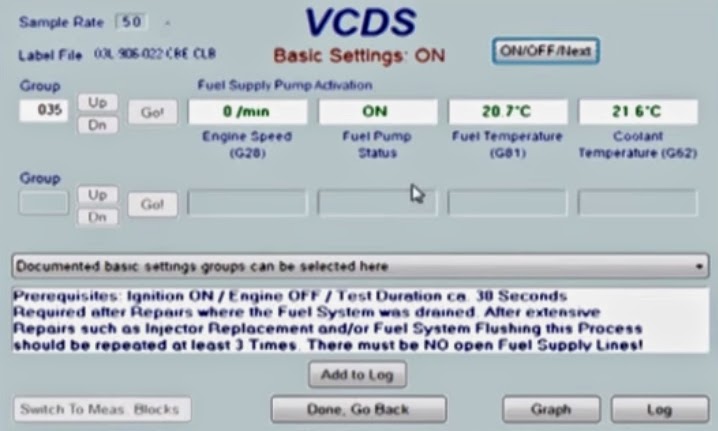
How to VCD Vagcom Prime / Purge your Fuel System / Fuel Filter (2009+ models)
Open up VCDS and follow these instructions:- [Select]
- [01 - Engine]
- [Basic Settings - 04]
- Set Group to “035″ (Fuel Supply Pump Activation)
- [Go!]
- [ON/OFF/Next]
The electric fuel pumps should run for 30 seconds
Purge 3 times (or more) if injectors have been replaced, or fuel system was flushed.
Alternatively, to cycle only the pump in the fuel tank:
- [Select]
- [01 - Engine]
- [Output Tests]
- [Fuel Pump Relay Control Circuit] from dropdown
- [Start]
Friday, 25 October 2013
Gym Jones 300 training fitness boards Week 12, session 3, day 7
26th July 2009 (20090726)
Week 12, Session 3, Day 7 - Push + Pull.
6rounds
Gym Jones 300 training fitness boards Week 12, Schedule
23rd July 2009 (20090723)
Week 12 Schedule.
Click here for all the 300 training posts.
Gym Jones 300 training fitness boards Week 12, session 2, day 4
23rd July 2009 (20090723
Week 12, Session 2, Day 4 - Body Weight.
28 minutes, maximum rounds
Click here for week 12, session 3.
Gym Jones 300 training fitness boards Week 12, session 1, day 2
21th July 2009 (20090721)
Week 12, Session 1, Day 2 - Push + Pull.
28 minutes, maximum rounds
To see the next session, click here.
Monday, 19 August 2013
Gym Jones 300 training fitness boards Week 11, session 3, day 6
18th July 2009 (20090718)
Week 11, Session 3, Day 6 - SMMF.
22 minutes.
To see week 12's first session, click here
Gym Jones 300 training fitness boards Week 11, session 2, day 5
17th July 2009 (20090717)
Week 11, Session 2, Day 5 - Push + Pull.
5 rounds.
Click here for Week 11, day 6 (session 3)
Gym Jones 300 training fitness boards Week 11, session 1, day 2
14th July 2009 (20090714)
Week 11, Session 1, Day 2 - Power Endurance.
Click here for Week 2, session 2 (day 5)
Gym Jones 300 training fitness boards Week 11 Schedule
13th July 2009 (20090713)
Week 11 schedule.
Click here for the Week 2, Day 2 (my first session) board
Friday, 5 July 2013
Gym Jones 300 training fitness boards Week 10 Workout 3
11th July 2009 (20090711)
Week 10, Workout 3 (day 6) - Power Endurance.
Click here for the schedule for Week 11
Gym Jones 300 training fitness boards Week 10 Workout 2
9th July 2009 (20090709)
Week 10, Workout 2 (day 4) - Tag Team.
Click here for the next board, Week 10, session 3
Gym Jones 300 training fitness boards Week 10 Workout 1
7th July 2009 (20090707)
Week 10, Workout 1 (day 2) - Tag Team.
Click here for the next board, Week 10, session 2
Tuesday, 18 June 2013
Gym Jones 300 training fitness boards Week 9 Workout 3
4th July 2009 (20090704)
Week 9, Workout 3 (day 6) - 2 minute turnovers.
Click here for the next board, Week 10, session 1
Gym Jones 300 training fitness boards Week 9 Workout 2
2nd July 2009 (20090702)
Week 9, Workout 2 (day 4) - 2 minute turnovers.
Click here for the next session, Week 9, workout 3
Sunday, 9 June 2013
MyProtein.com Abs Challenge - Suppliments
BCAA 5mg before and after training.
Glutamine 10mg before and after training.
Impact Whey 50mg after training.
Part of the training involves chin ups, so I've purchased, and installed a chin-up bar to improve upper body strength.
Gym Jones 300 training fitness boards Week 9 Workout 1
30th June 2009 (20090630)
Week 9, Workout 1 (day 2) - Push Pull.
Click here for the next session, Week 9, workout 2 (day 4)
Gym Jones 300 training fitness boards Week 8 Workout 3
27th June 2009 (20090627)
Week 8, Workout 3 (day 6)
Click here for the next workout, week 9, session 1 (day2)